
[MoHA] How to Fight Smart
Day 3,222, 12:32
•
Published in United Kingdom  •
by
•
by
 •
by
•
by eUK Home Office

Hello future big hitters, Today I will show you how to fight smart!
But first a disclaimer: I personally don’t know how to fight smart. Then how can i help you fight smart I hear you ask. Well this guide is a culmination of reading and scouring through old guides made by people who do know how to fight.
Part 1 - MoD orders & Strikes:
First and most importantly follow the MoD orders for the day. They will tell you where to fight to get the most use out of your energy! They will also tell you if the tank fund is open, where you can buy tanks for cheaper than the market price. Make sure you look at this before you attack anything.
Here is todays orders - CLICKY
Other important events to look out for are Strikes, organised events used to direct damage to an important battlefield, they usually come with free handouts so if you see one make sure you attend.
Just to drive it home: Follow those MoD orders!
Part 2 - Strength:
For this part i would like to direct you to this article written by Sir Charles Moncrieff.
https://www.erepublik.com/en/article/-moha-how-to-get-buff--2605712/1/20
Part 3 - The Military Module:
For a comprehensive guide to the military module here is an article by “Cheetah, Gali, MS10EL, KJ, Wolds, Frix, and MIK”.
https://www.erepublik.com/en/article/-moha-the-complete-guide-to-the-military-module-2563178/1/20
The battlefield has changed a little bit since that article. It now looks like this.
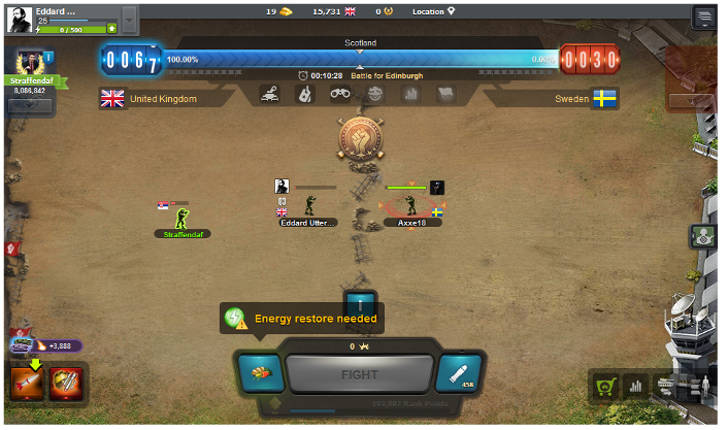
It contains Icons under the domination bar that display stats about the current battle zone, fighter statistics and war history (those are the ones active in that image). Also the button in the very middle shows you your division
Just to reiterate about the bar at the top. The domination bar is influenced by the fights from both sides. The goal is to keep is over 50% for your side as long as possible. For every minute or so the bar is over 50% 10 points are awarded. With an increase of 10 at the second and third half hour and an increase of 30 in the last half hour. So in the first half hour 10 points per minute are gained, the 2nd half hour 20, 3rd 30 and 4th 60. Once the total amount of points reaches 1800 that side wins the round.
Part 4 - Bazookas, Energy Bars, Boosters and Battle Heroes:
Save your boosters, energy bars and bazooka parts until you have enough to try for a Battle Hero medal (top influence in a 1.5 hour mini-battle).
Battle Hero medals give you a small Gold reward, so are worth a small investment in food and guns if necessary.
If you read the Military Module article then you’d know that one Bazooka shot will give you 10,000 influence. So as one Bazooka has three shots you get 30,000 influence per Bazooka.
There are four types of booster: the bazooka booster, damage booster, battle booster and ghost booster.
Bazooka boosters allow citizens to inflict more damage with bazookas based on their division; 20000 in 1st, 30000 in 2nd, 40000 in 3rd, 50000 in 4th. Though remember that if you have a bazooka booster in your inventory then you get promoted, your booster does not get promoted with you!
The damage booster adds 50% or 100% additional damage for a limited time between 5 minutes and 24 hours. Damage boosters can be built on Quality 4 and 5 rocket factories or achieved as reward through missions, Weekly challenge or Power spins. Though remember damage boosters built in rocket factories activate in the moment they are built.
Battle boosters can be found on the right side of the battle field. There are three types of battle booster: Enrage Comrades, Rejuvenate Comrades & Disarm Enemies. They all have three tiers of quality ( 1 | 2 | 3 )
Enrage Comrades grants 30% | 40% | 50% damage bonus for 4 | 6 | 8 minutes which cost, in gold, 4.99 | 9.99 | 19.99 with a cooldown of 3 | 4 | 5 minutes
Rejuvenate Comrades grants the use of only 9 | 8 | 7 energy per hit for 3 | 4 | 5 minutes which cost, in gold, 9.99 | 15.99 | 24.99 with a cooldown of 2 | 3 | 4 minutes
Disarm Enemies grants the ability to disable all weapons (except for bazookas, bombs and rockets) for 1 | 2 | 3 minute(s) which cost, in gold, 19.99 | 34.99 | 44.99 with a cooldown of 20 | 20 | 20 minutes (this cooldown affects everyone on your side).
Ghost boosters give you 30% of the biggest damage/hit of the Citizen (ally) who fights in the same round of the division you are in. Each ghost booster lasts for 1 minute, can be stored and have no expiry date.
Energy Bars will give you 100 Health or 10 hits. Use a combination of Boosters, Bazookas and Energy Bars to reach top damage for the mini-battle in your Division.
DO NOT assemble your bazooka parts until you want to attempt a Battle Hero reward.
Bazookas must be used when assembled or you can use another weapon in its place if you wish to save your assembled bazooka.
Do not buy Bazooka Boosters or Bazooka parts unless you have extra real-life money to spend. Boosters and parts are not a good use of in-game Gold.
Part 5 - Communicate.
Lastly join an active military unit and ask the big hitters there any questions you have that this article doesn’t cover. Be sure to also check if they host strikes that you can take part in.
There you have it, if you follow these points you will be significantly more competent than someone who doesn’t follow these points and if you’re following the people not following these points then you better start following these points.
Thank you for reading.
This has been Eddard blagging his way through a military guide.
Your Junior MoHA / Minister of Education.
P.S. Follow those MoD orders!


Comments
You could have asked the MoD (I has old MoD guides) 😉
Liking this a lot though got lots of new information on the boosters
A good guide
"DO NOT assemble your bazooka parts until you want to attempt a Battle Hero reward.
Bazookas must be used when assembled or you can use another weapon in its place if you wish to save your assembled bazooka."
Whhatt?